Drawing on Google Maps is a fun, creative way to explore the world around you and get creative with an online canvas. With Google Maps, users can draw personalized shapes, add text labels and markers, and even create custom maps for others to enjoy. We will provide an overview of how to draw on Google Maps and tips for using the many features available.
From drawing lines and shapes to sharing photos, stories, and more, Google Maps provides a wide range of tools that help mapmakers express themselves in unique ways.
Whether creating colorful travel maps or sharing business locations with customers, this guide will walk users through drawing with Google Maps and tips and tricks for getting the most out of their experience.
Table of Contents
How to Draw on Google Maps?
Drawing on Google Maps is a fun and useful skill that can create custom maps, highlight points of interest, and even plan routes. With the help of some simple tools and a little bit of creativity, anyone can draw on Google Maps.
Step 1: Open Google Maps
The first step in drawing on Google Maps is to open the app. You can do this on your computer or mobile device. To open Google Maps on your computer, go to Google Maps in your web browser. To open Google Maps on your mobile device, download the Google Maps app from the App Store or Google Play Store.
Step 2: Create a New Map
Once you have opened Google Maps, you need to create a new map to start drawing on. To create a new map, click on the “Menu” button (three horizontal lines) in the top left corner of the screen, and then click on “Your Places”. From here, click on the “Maps” tab and then click on the “Create Map” button. This will create a new map that you can start drawing on.
Step 3: Add a Layer
To add a layer to your map, click on the “Add Layer” button in the screen’s bottom left corner. This will create a new layer that you can use to draw on.
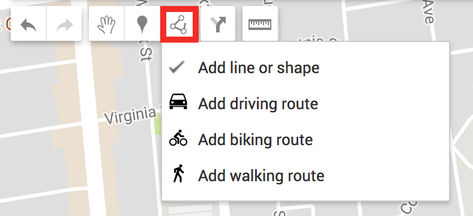
Step 4: Draw a Line or Shape
To draw a line or shape, select the “Draw a Line” or “Draw a Shape” tool from the toolbar on the left side of the screen. Click on the layer where you want to draw your line or shape, and then click where you want the line or shape to start. Continue clicking along the line or shape to draw it, and then double-click to finish it. You can add bends to your line or shape by clicking and dragging along the line.
Step 5: Add Text
To add text to your map, select the “Add Marker” tool from the toolbar on the left side of the screen. Click on the map where you want to add the text, and then enter the text you want to add in the “Title” and “Description” fields.
Step 6: Save Your Map
Once you have finished drawing on your map, you need to save it. To save your map, click on the “Save” button in the top left corner of the screen. Give your map a name and description, and then click “Save” again.
However, drawing on Google Maps is a fun and easy way to create custom maps, highlight points of interest, and plan routes. By following these simple steps, you can draw on Google Maps with ease. With a little bit of creativity, the possibilities are endless. Whether planning a road trip or just exploring your local area, drawing on Google Maps is a great way to make your maps more personalized and informative. So what are you waiting for? Start drawing on Google Maps today!
How to Draw on Google Maps: Tips and Tricks
Google Maps is a versatile tool that offers a wide range of features to make navigating easier. One of the useful features of Google Maps is the ability to draw on the map. Here are some tips and tricks for drawing on Google Maps:
How to Draw on Google Maps?
To draw on Google Maps, users can simply head to the “Your Places” option in the main menu and select “Maps.” Users can create a new map or edit an existing one. Once the map is open, users can click on the “Add Marker” option to start adding points or shapes to the map. Users can also customize their drawings’ color, style, and size.
Tip 1: Use Custom Labels
Google Maps allows users to add custom labels to their drawings. These labels can mark specific locations on the map, such as favorite restaurants or points of interest. To add a custom label, simply click on the “Add Label” option in the main menu and enter the desired name.
Tip 2: Use Offline Maps
Users can also draw on offline maps. This can be useful when traveling to areas with poor internet connectivity. To use offline maps, users can download the desired area to their device and draw on it as they would on an online map.
Tip 3: Share Your Drawings
Google Maps allows users to share their drawings with others. This can be useful for sharing travel plans or marking points of interest for friends and family. Users can simply click on the “Share” button in the main menu to share a drawing and enter the desired email addresses.
Tip 4: Edit and Delete Drawings
Users can also edit or delete their drawings at any time. To do so, simply open the map and click the “Edit” button in the main menu. From there, users can make any necessary changes or delete the drawing entirely.
In conclusion, Google Maps offers many features to make navigating easier, and drawing on the map is one of them. Following the tips and tricks outlined above, users can create custom maps and share them with others, making Google Maps more versatile and useful.